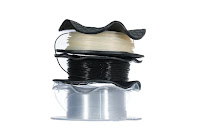
Moisture in 3D printing filaments can ruin prints. The high hygroscopicity of some materials like Nylon (PA) or, to a lesser extent, PLA makes them prone to absorbing water vapor from the air.
When printing, as the filament gets heated past the water boiling point, water molecules vaporize. That can wreak havoc on the extruded filament: holes, stringing, weaker mechanical properties, weaker layer adhesion. Hello crappy looking parts.
What to do ? Easy: one can move to Colorado where relative humidity often hovers around 20%. Done ! Not a solution for all though 😅
So, I went on another 3D printing endless-hobby endeavour: hacking an electrical oven into an actual filament dryer.
Cherry on the cake, it can also be used to regenerate the desiccant used in a filament dry storage box, or to anneal printed parts. Silica beads should regenerate after 1 to 4 hours at 120-150°C (250-300°F). Alumina might take up to 8 hours at 200-250°C (390-480°F). For annealing, see the "Post-printing processes - Annealing" row in the Bambu table below.
Of course, buying a cheap filament drying heater box from Comgrow, Sunlu, Eibos, etc, would have been simpler. But none goes higher than 70°C, when Bambu Lab's high speed ASA / ABS / PA filaments recommend 80°C:
More on exploring such solutions in the "Alternatives" section at the end of this post.
Now, finding out how effective a drying method is can be tricky. This great video from CNC kitchen partially answers that question:
Just remember that when a spool weight curve asymptotes does not mean that no moisture is left in the filament. It only means that the dryer used ran out of steam (pun!). At that point a whimpy dryer may have removed only 50%. A more robust method like vacuum + high heat could likely remove some more.
And with all that preamble done, let's jump right into this oven hack !
A simple Electrical Oven Solution
The idea is simple: just turn the whole oven on and off using an external digital thermostat.
Wanting to dry 2 spools at a time, this $60 refurbished convection oven seemed perfect:
It's not a 'Blast oven' per Bambu's requirements but, hopefully, using the convection mode will be close enough. It is purely mechanical, no electronics, making it easy to hack its controls. It is also tall & deep enough to host 2x 1kg spools.
Now, to avoid melting the filament or the spool holder, temp overshoots must be avoided at all cost as getting close to 100°C will likely have disastrous consequences.
So, since an oven's bimetal thermostat is not known for its temp control accuracy, and as I wanted to easily input a temp target (55°C for PLA, 80°C for ASA, etc), the oven will simply be power-controlled by a digital thermostat sporting a programmable on / off temp band (ie hysteresis).
Just shove the probe in the oven chamber, set the oven to an always-on convection heating mode, and simply control its input AC power with the digital thermostat.
Admittedly, a Proportional-Integral-Derivative (PID) controller would have been even perfect for temp regulation, but I was too lazy to go there, taking a shortcut instead. Of course, as Engineers in the field know, shortcuts in regulation loops are never a good idea. Reality checks incoming 😅
By the way, never use a Natural Gas / Propane oven to dry filament ! Since hydrocarbon gases are made of CyHz molecules, their combustion releases CO2 and H2O. Plus a bunch of nasty PMs / HCs / VOCs, hence the push to ban household gas ovens & ranges in the US, but that's another story.
Methane combustion example: CH4 + 2 O2 ➜ CO2 + 2 H2O
Oooops, all that H2O vapor wouldn't help drying our filaments, now would it ? 😂
Coincidentally, the chemical reaction above powers Starship !
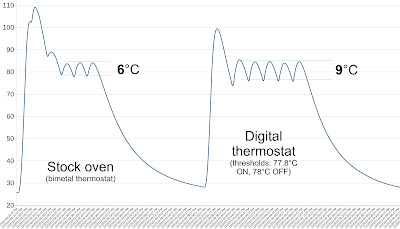
Using the handy Onset Hobo UX120-006M 4 channel analog data logger and a TMC-H6 temperature probe allowed to plot the oven chamber's temp over time.
Results from stock oven:By Jove, how on earth is the stock bimetal thermostat so well behaved ? Yeah, tuned device for that oven's thermal inertia and current. Intuition and regulation loops really do not mix well. Got caught. 1st strike ! 😅So we're done, right ? No need for a digital thermostat. Just preheat the oven for 20' without the spools to get past the initial temp overshoot, then add the spools and that's that.
Well, not so fast. Don't want to fiddle with the oven's analog temp knob over several minutes each time to trial-and-error set the desired temperature. Sure, could characterize a few knob positions and mark the measured temps. But that'll depend on the room temp, as a bimetal thermostat not directly coupled to the heated air / chamber, as pictured below, partially depends on the room's ambient temp in their response. That would throw things off when the oven is moved to the garage and with seasonal temp swings.
So, back to the digital thermostat.
Also, we need to ensure that the radiative thermal power (infrared), which is not measured by basic thermostats, doesn't cook the surface of the spools. Right now, in the convection mode, the oven turns on both the upper and lower heating elements for a total of 1500W. The elements are bare, not shielded, so as to cook that chicken to a perfect crisp. Yummy, but no bueno for our exposed filament.
And 1500W is way too much anyway since this is only a low temp 80°C application. No need to quickly reach the oven's 230°C (450°F) max temp here.
So let's simply disconnect one of the elements and test again.
Using the lower element, instead of the upper one, should theoretically improve the homogeneity of the air temperature across the chamber thanks to increased natural air convection and less stratification.
Results:
The regulation ripples are now longer as less power is injected into the system, but the swings are still too tall for my taste.Before tuning further though, since it will be necessary to evacuate the moisture as the filament dries out, let's see what cracking the door 1/4" (6mm) open does:
Sainte Baguette croustillante... what on earth ?
This striking change is likely due to the differences in the thermal coupling setup between the digital probe and the bimetal switch. Being right inside the chamber, the digital thermometer closely experiences the now-leaking-air temp changes and regulates accordingly. Whereas the oven's thermostat is comparatively very remote (partial coupling to chassis metal + air in the side compartment + current) . In other words, my 'thermal regulation intuition' is really off. 2nd strike ! 😅
But hey, I'll take that. This is the digital control result we need !
Before an actual multi-hour drying run though, a fix must be developed to work around the 90' max run time of this oven's timer. Indeed, it does not have a 'Stay ON' position on its dial, unlike the basic but too small Black&Decker models.
So the timer knob either needs to be bypassed or be prevented from counting down. I chose the latter option by 3D printing a slip-on clamp for the knob. Worked like a charm ! The CAD & STL files are here
Finally, it is time for an actual filament-drying run. A piece of aluminum foil was placed on the rack under the spools, to cut down on direct radiative exposure from the heating element underneath. And a large hole was cut in its center to let air rise through the spool cores.
The spools were also propped up with spacers to provide air gaps for improved evacuation of the moisture from all sides. The Bambu spool's walls having a whole bunch of perforations also help in that regard.
And voila, perfect prints now await us.Happy printing to all !
Alternatives
Initially, other approaches were also investigated. Like using a dry storage box that contains desiccant, per this previous build post.
However, although these are great for keeping filament dry, they are pretty much useless to remove moisture already absorbed by the filament.
Since heating is necessary to remove water vapor already absorbed by a filament, an active spool drying solution is needed. Unfortunately, the plethora of dryer boxes available out there from a dozen me-too-copy peddling brands do not meet the 80°C spec'd by Bambu Lab.
Now, maybe that spec is exaggeratedly high. But my
experience so far with Bambu's technical acumen has shown a much better track record than with many of the consumer brands behind dryer boxes.
Interestingly, most of these $40-$70 products were barely reaching 50°C a while back. Then some got upgraded to 60°C, and now the recent models claim 70°C. Positive trend. Still not cutting it for Bambu's 80°C spec for ASA / ABS / PA, but getting there.
This said, to be fair, most youtubers who reviewed them seemed positive. Even claiming that filament dipped in water for days now prints perfectly.
Great. Some of these tests did ring technically legit. Though many clearly did not understand the concept of relative humidity (RH), marveling at how the hygrometer readings fall within minutes after turning on an air heating box. Hint: the physics explanation lies in the terms 'relative', 'air' and 'heating', has nothing to do with the filament actually drying yet...
Also, filament dipped in water does not absorb and adsorb (not a typo) water the same way as it does water vapor. Because surface forces, temperature, different states of matter, and all that. But hey... "Youtube" 😅
And don't get me started on the 'in-line dryer' wizardry a la Filadry or Thorndsen 3D. Stellar reviews. Go for it !
Finally, another 'simple' solution would consist in repurposing a 3D printer heating bed. Like here: Drying procedure example. Would love to develop a prototype but, not having an old spare printer bed lying around, and looking for an easy hack, the oven seemed the shortest path for now.


Comments
Post a Comment