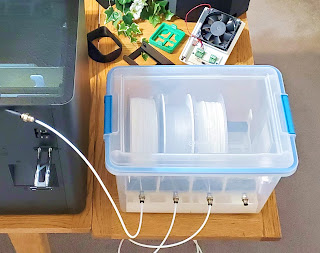
A rite of passage in the 3D printing hobby world: making your own filament storage dry box !
The goals for this build are:
- Up to 4x 2.2lbs (1kg) spools
- Spool size up to 8" diameter x 2.75" width (200x68mm)
- Access to each individual roll without disturbing the others
- Stable guiding of the spools, both when full or near empty
- Desiccant storage independent from the spool carriers
- Small footprint
Several DIY projects out there provided inspiration for this design. Especially Marsgizmo's Filament Bunker
As well as the very refined Anybox from 3D Print Files
Thank you all for sharing your experience and designs with everyone 👍
Accessing spools independently ruled out designs based on a rod running through the center of the spools. Although that is a super simple design, it requires taking all the spools out of the box to do anything. Instead, I went with rollers mounted on a carrier for each spool. The bearings are just the ubiquitous 608 8x22x7mm skateboard bearings.
Note the tongue on the right side of the carriers. It keeps the spool further away from the box's wall where the filament exits. That decreases the max and min angles the pulled filament starts and ends at while unwinding, from full-spool (filament farthest away from core) to empty (filament closest to core).
The desiccant tray is a simple ~1.5" tall box with ribs to provide a stable platform for the spool carriers. The front and back ribs are slightly raised such that the carriers sit snug within, preventing them from moving forward when the filament is pulled.
Finally, the pass-through holes in the box for the filament were drilled lower than the height of the spool's core to provide a downward stabilizing force on the spool once near empty.
Many designs put these holes high in the box which has a tendency to lift the spool up. That works pretty well only until the spool is close to spent. At that point, being 2.2lbs lighter, it can easily lurch up / forward if there is any filament tangle, or when the bent end of the filament that is hooked to the core catches at the very end.
With all these parts printed, time to add some Reusable Alumina Desiccant or Pure Silica Gel Desiccant, install the pneumatic bulkhead union fittings, plug in some 4mm OD PTFE tubing, and TaDa! a completed dry box we now have.
Finally, to monitor the humidity in the box and know when to recharge the desiccant via a heat cycle in the oven, a humidity meter can be used. Like the excellent $16 AcuRite 01083M that provides high accuracy measurements and actually supports the full 1-99% Relative Humidity (RH) range. Unlike most cheapos out there that don't reliably go below 20% RH. That's pretty key when some sensitive filaments require around 10% RH to print smoothly.
The CAD & print files are available here, with a choice of several formats: F3D Fusion 360, Sketchup, STL, STEP, etc.
And with that, endless hours of 3D printing fun now await us.
Happy printing to all !


Comments
Post a Comment